
Difficulty | Duration |
|---|---|
Medium | 10 - 15 Minutes |
In this post, I’ll walk you through my shortcut: a Charger Connected automation that checks the current hour using regex, then:
Shows a quick “Worked” notification (for testing purposes)
Sets your volume to 50%
Turns Sleep Focus on until turned off
If it’s outside the night window, it simply shows “Failed” (which is handy while you’re testing). Once you’re happy it’s working, you can remove the notifications and keep it completely silent.
Why build a night-only charging automation?
Most of us plug in our iPhone at random points in the day, and again at night. The problem is that a “When Charger Is Connected” automation will run every single time unless you add a condition.
This is where a time filter is useful. At night you might want your iPhone to:
Switch to Sleep Focus
Set a comfortable volume for audio
Dim distractions and reduce interruptions
During the day, you probably do not want any of that happening just because you’ve connected a cable.
What you’ll build
A Personal Automation in Shortcuts that:
Triggers when your iPhone is connected to power
Converts the current time into a two-digit hour (00–23)
Uses Match Text with a regex pattern to decide whether the hour is in your night window
Runs your night actions only if the regex matches
Because we’re matching the hour only, the night window covers these hours:
21, 22, 23, 00, 01, 02
That effectively means 21:00 through 02:59.
Step-by-step: create the automation
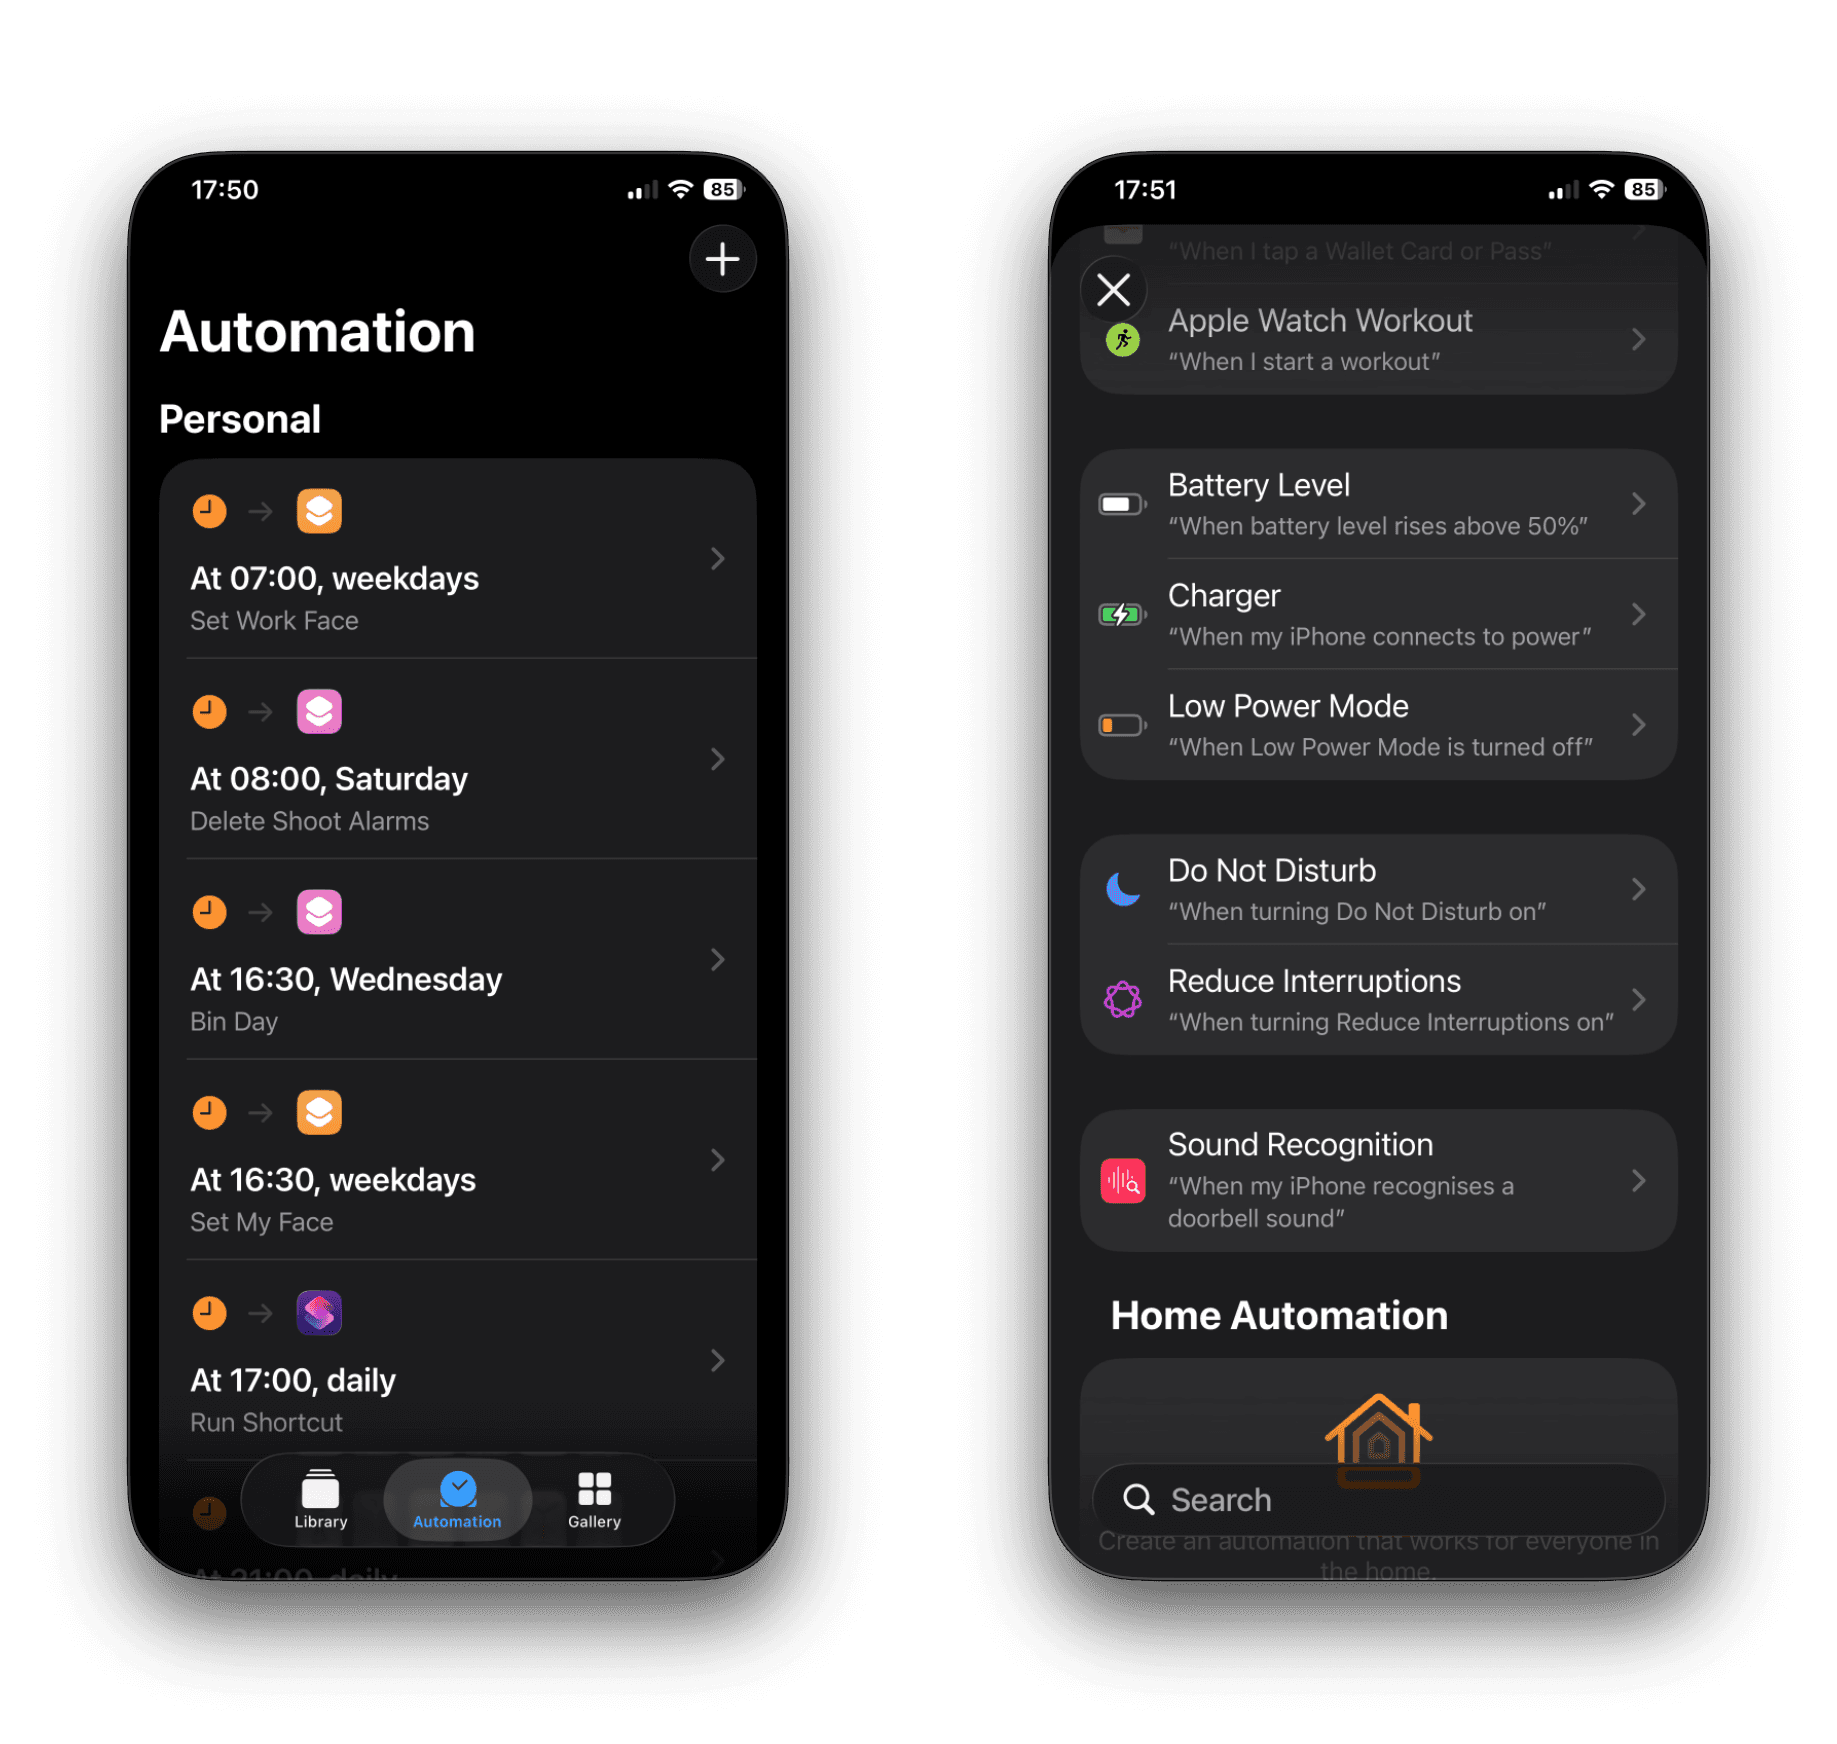
1) Create the “Charger Connected” automation
On your iPhone:
Open Shortcuts
Tap Automation
Tap +
Tap Create Personal Automation
Choose Charger
Select Is Connected - select Run Immediately
Tap Next
Select Create New Shortcut
You now have an automation that runs every time your iPhone starts charging, whether via cable or wireless.
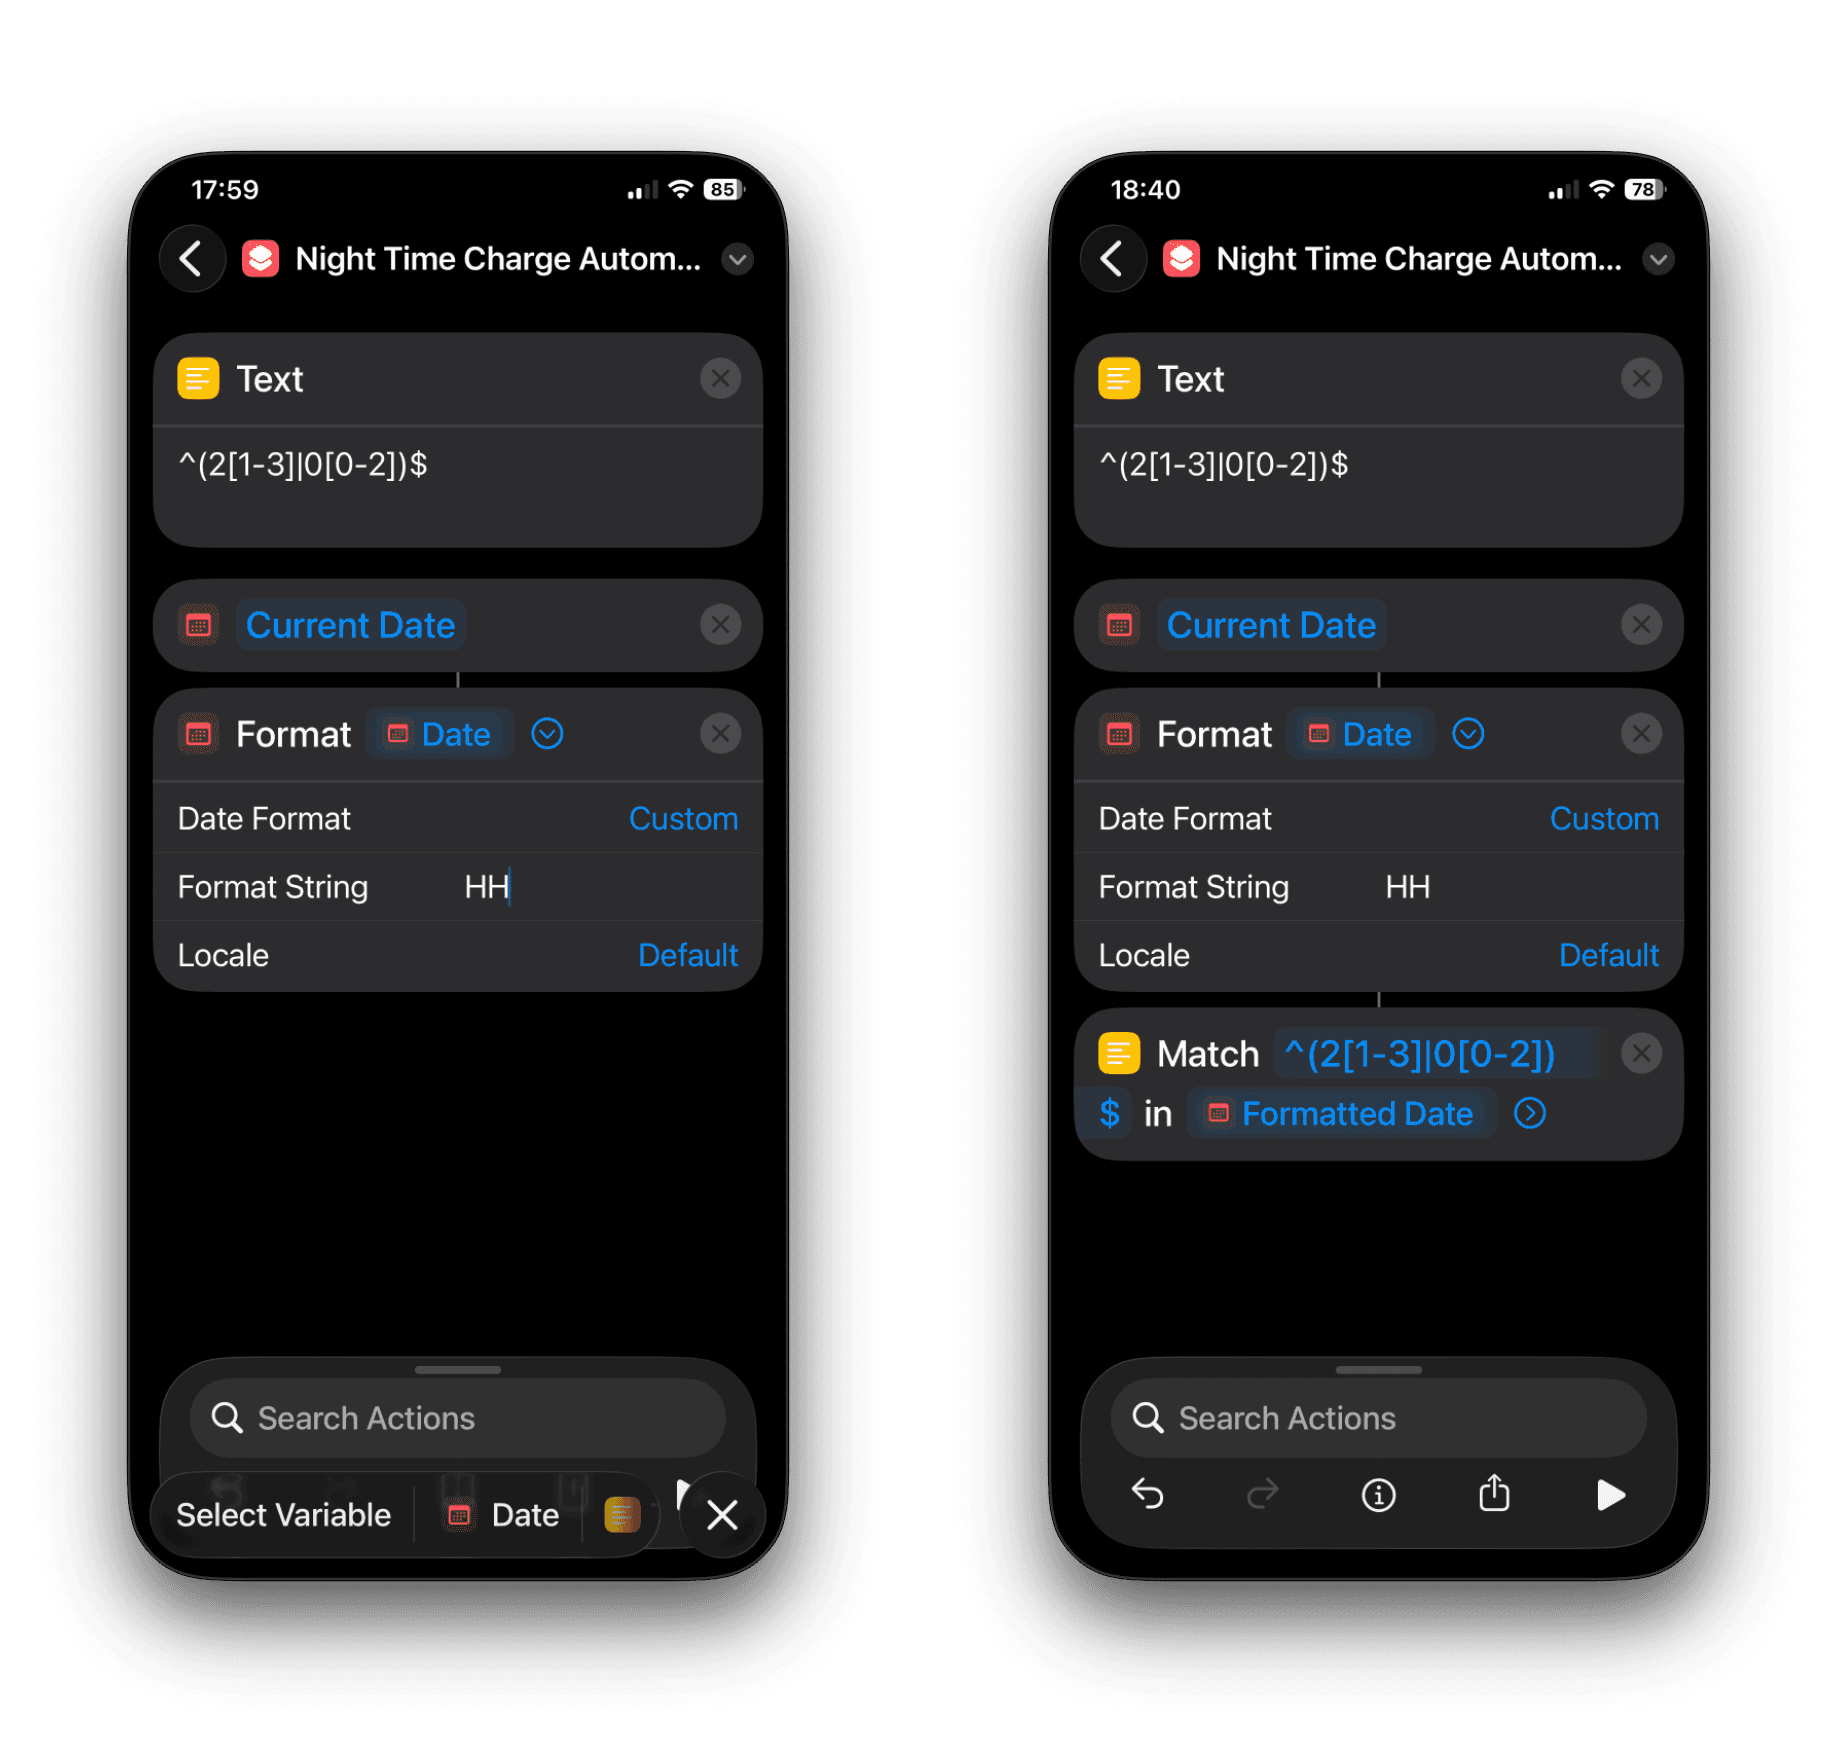
2) Add the regex pattern (Text action)
Add a Text action and paste in the following pattern:
^(2[1-3]|0[0-2])$
Keeping the pattern in its own Text action makes it easy to reuse and tweak later without hunting through other actions.
3) Get the current hour in 24-hour format (HH)
Now add:
Current Date
Format Date
• Date Format: Custom
• Format String: HH
This gives you a two-digit hour string such as 00, 01, 21, 23.
The important bit is using HH (24-hour clock, two digits). That leading zero is useful because it keeps the value consistent and predictable.
4) Use Match Text to apply the regex
Add Match Text:
• Text: set this to the Formatted Date output (your hour)
• Pattern: set this to the Text variable that contains the regex
In plain English, you’re telling Shortcuts:
“Check whether the current hour matches my allowed hours.”
5) Run the routine only if a match is found
Add an If action and set it to:
• If Matches has any value
Make sure you are selecting Matches from the Match Text action output (not the Text action containing the regex).
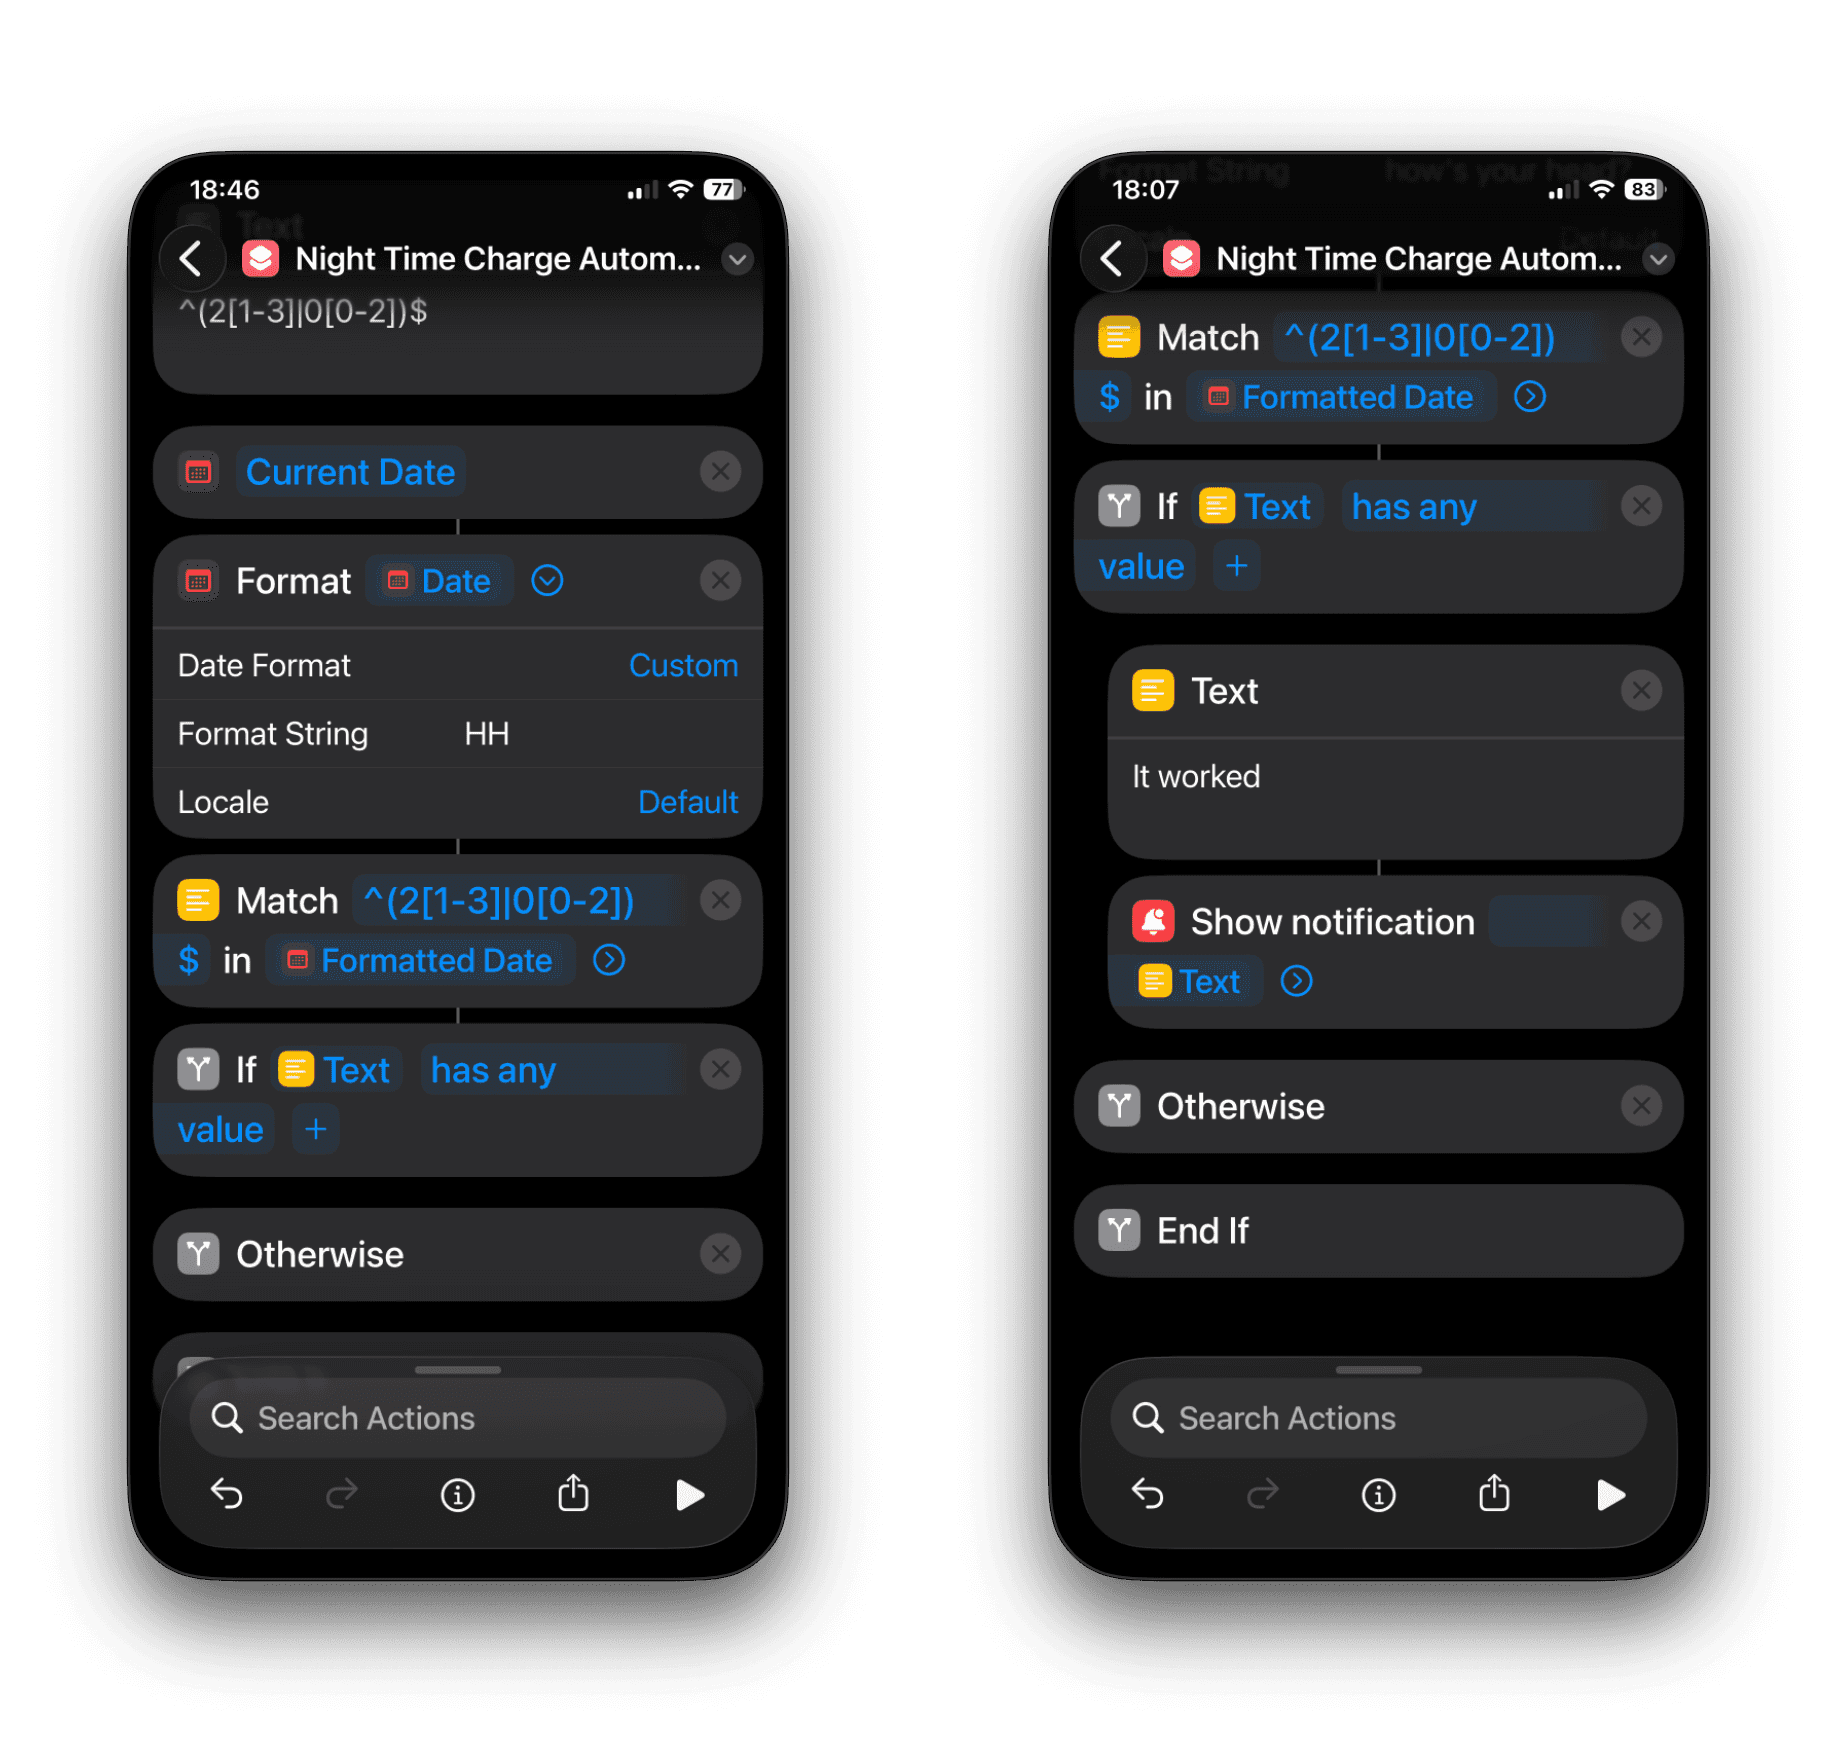
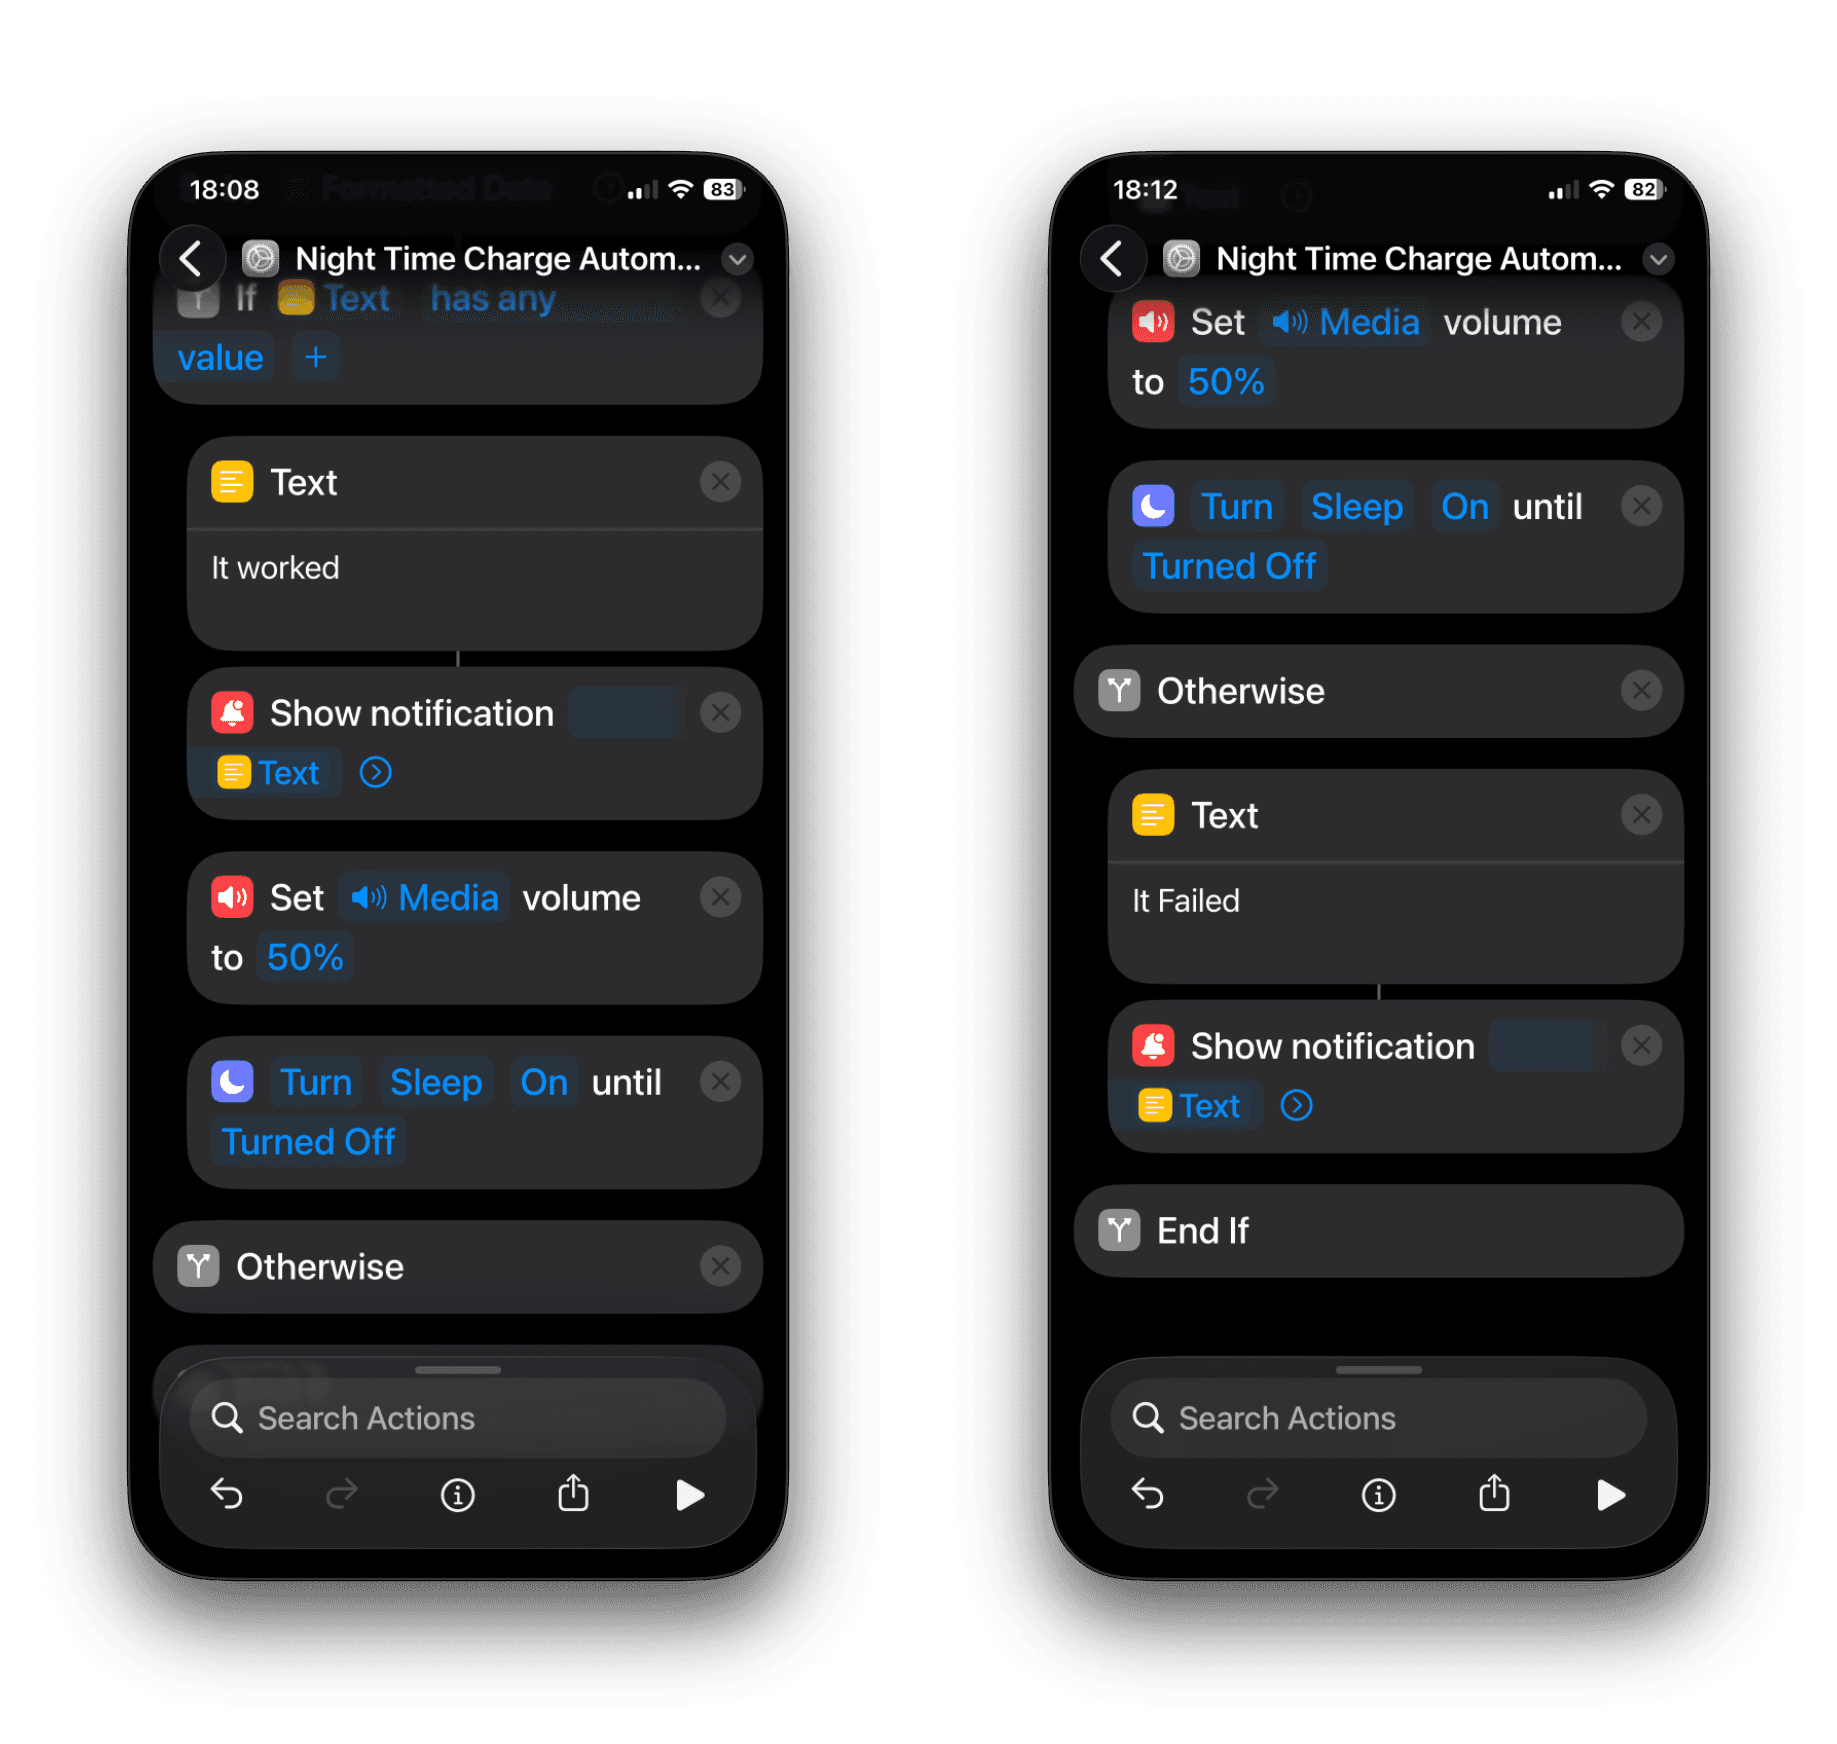
Inside the If branch, add the actions you want to run at night. In my final shortcut I used:
Text → It worked
Show Notification (using that Text value)
Set Volume → 50%
Turn Sleep On until Turned Off
Inside Otherwise, I used:
Text → It Failed
Show Notification (using that Text value)
Those notifications are excellent for testing. If you prefer a silent automation later, you can remove them once you trust it.
The finished shortcut (exact action order)
Here’s the completed flow in one place:
Text → ^(2[1-3]|0[0-2])$
Current Date
Format Date → Custom: HH
Match Text → Pattern (Text regex) in (Formatted Date)
If Matches has any value
Text: Worked
Show Notification (Worked)
Set Volume to 50%
Turn Sleep On until Turned Off
6. Otherwise
Text: Failed
Show Notification (Failed)
7. End If
Regex explained in a friendly way
Regex is short for regular expression. It’s a way of describing patterns in text using a compact set of symbols. In Shortcuts, regex is especially handy because it lets you make a quick “does this match?” decision without building lots of nested If statements.
This is the pattern we used:
^(2[1-3]|0[0-2])$
Let’s break it down.
^ and $ (start and end anchors)
• ^ means “start of the text”
• $ means “end of the text”
Using both means your pattern must match the entire string. That matters because we want to match the hour value exactly (like 00 or 21), not just part of a longer string.
( … | … ) means “either / or”
Inside the brackets is a choice:
match the left side or
match the right side
So:
(2[1-3] | 0[0-2])
means “match 2[1-3] or match 0[0-2]”.
2[1-3] matches 21–23
2 is literal
[1-3] means one character that can be 1, 2, or 3
So it matches: 21, 22, 23.
0[0-2] matches 00–02
0 is literal
[0-2] means one character that can be 0, 1, or 2
So it matches: 00, 01, 02.
Put it all together and you have a neat list of allowed hours:
• 21, 22, 23, 00, 01, 02
That’s the whole trick.
Why regex makes midnight easy
Time conditions that cross midnight often turn into logic like:
• “after 21:00 OR before 02:00”
That’s workable, but it’s easy to misread and even easier to implement incorrectly if you’re rushing.
Regex keeps it explicit: you’re matching a set of hours. There’s no ambiguity about midnight, no date maths, and no complicated time comparisons.
Customising the night window
If you want to adjust the time range, you usually only need to change the regex.
Here are a few examples if you want to include them in your post as “variations”:
22:00–05:59
Allowed hours: 22, 23, 00–05
^(2[2-3]|0[0-5])$
20:00–23:59
Allowed hours: 20–23
^(2[0-3])$
00:00–06:59
Allowed hours: 00–06
^(0[0-6])$
If you ever want a strict cut-off by minutes (for example, stop at exactly 02:00), you’d switch Format Date to HHmm and build a more detailed pattern. For most “night routine” shortcuts, hours-only is a sensible balance of simplicity and usefulness.
Testing tips (so you know it’s working)
While you’re building, keep the “Worked” and “Failed” notifications. They make it instantly obvious which path your automation is taking.
To test without waiting until night:
temporarily change your device time, or
temporarily replace “Current Date” with a Text action like 00 or 14 and run the shortcut manually
Once you’re confident, remove the notifications if you want everything to run quietly.
Useful improvements (optional)
If you’d like to enhance the automation without making it complicated, consider adding one or two of these actions inside the night branch:
Set Brightness to a low level
Set Low Power Mode (optional)
Play a playlist or start a podcast at a comfortable volume
Run Another Shortcut
Run a HomeKit scene like “Bedtime” to turn off lights etc.
Wrap-up
This shortcut is a great example of why iOS Shortcuts is so powerful: a simple trigger (connecting to power) becomes a dependable night routine with just a small regex check.
Once you’ve built it, you can reuse the same pattern anywhere you need a time gate that spans midnight. It’s clean, readable, and easy to tweak later.
If you want, tell me what you’d like your “night charging routine” to do beyond volume and Sleep Focus, and I’ll suggest a few options that stay beginner-friendly and fit naturally into this same structure.


More in

Shortcuts
Jump Straight to Any App’s Settings with This Two-Step Shortcut
Shortcuts
Shortcuts: Power menu
Shortcuts
Check which door or window sensors are open using Shortcuts

Shortcuts
A Smarter Way to Organise Screenshots Using Apple Shortcuts

Shortcuts
One tap playlist

Shortcuts
Morning Routine

Shortcuts
Create an iOS Automation When Connecting AirPods
Shortcuts
Create an iOS Shortcut to Capture, Name, and Save Receipt Images.

Shortcuts
How to Save macOS Screenshots Anywhere with Shortcuts (Part 2)

Shortcuts
Create a menu based Shortcut
Shortcuts
How to Save macOS Screenshots Anywhere with Shortcuts (Part 1)
Shortcuts
Its the simple things.

Shortcuts
macOS Shortcut: Test Your Network Speed.

Shortcuts
Apple TV Shortcuts

Shortcuts
Trigger When an App Is Opened or Closed

Shortcuts
Estimated Time Of Arrival.

Shortcuts
Apple Watch Action Button.

Shortcuts
iOS 18 adds new If Command Features.
Shortcuts
Automations: Low Power Mode.

Shortcuts